Installation Guide
Prerequisites
All dependencies and their installation is managed via Ansible which we run through a docker container. So, the only required dependency for this setup is docker. Follow the steps specified at this link and then allow non-root users to use docker by following these steps.
Testbed Setup
The physical resources required on each machine are shown in the following figure.

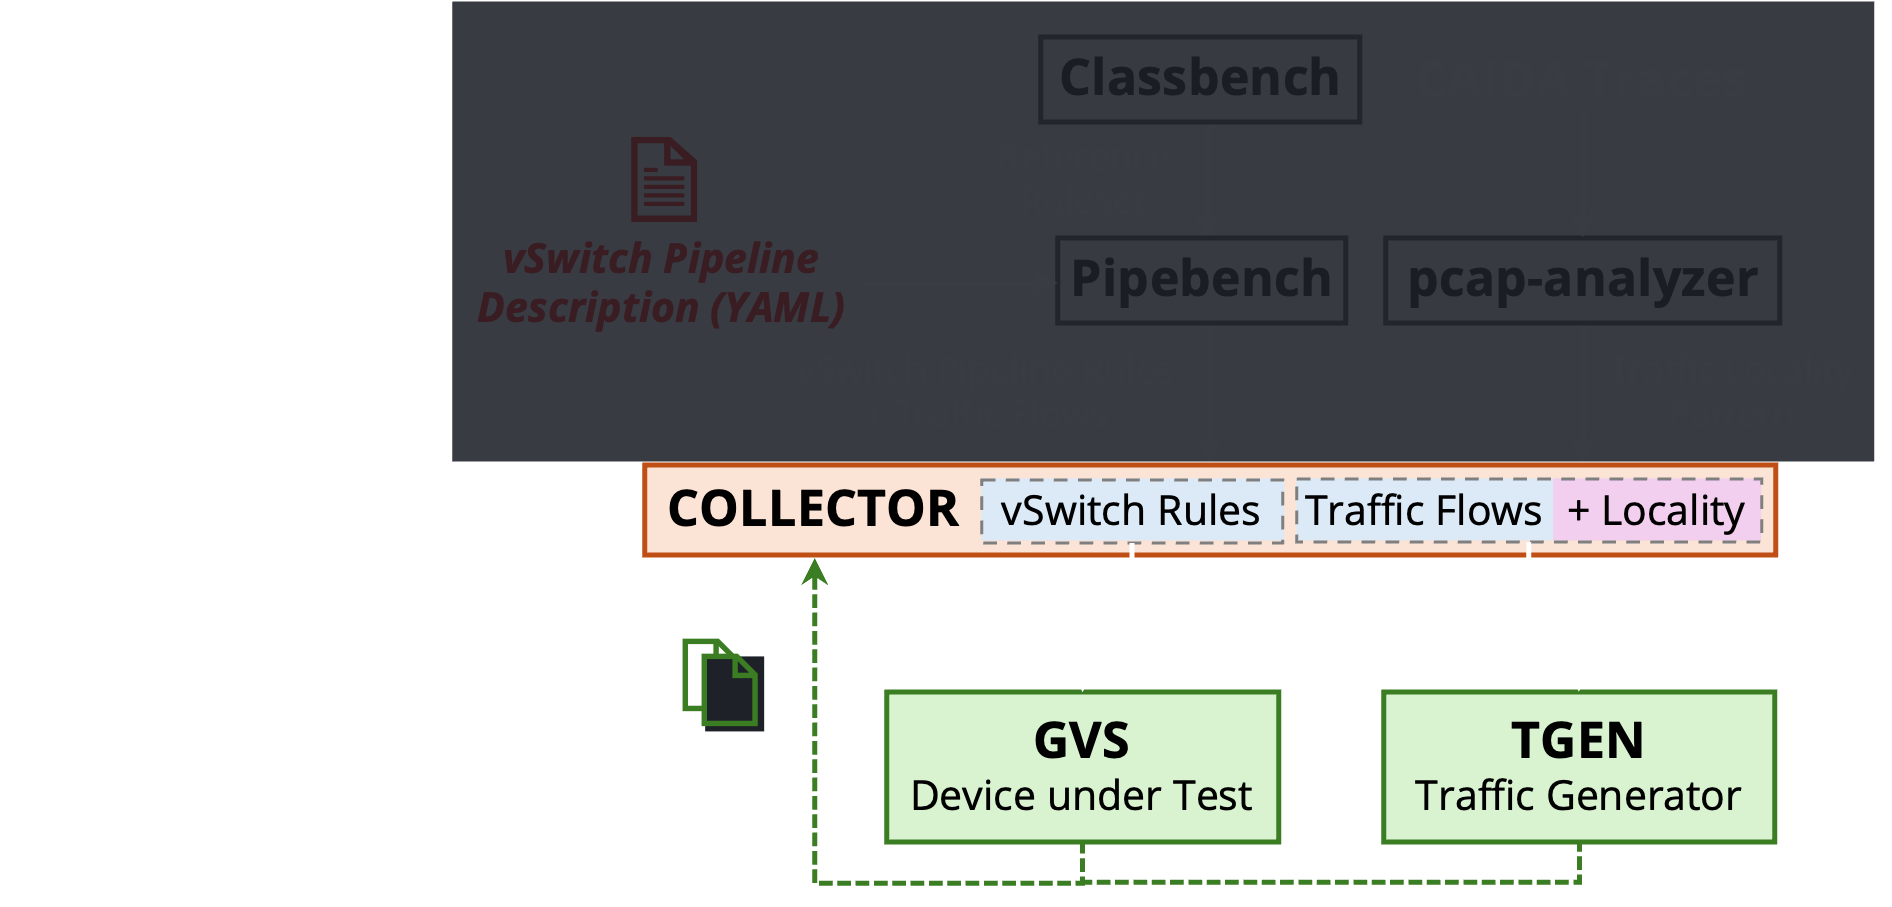
The testbed requires 3 machines:
COLLECTOR→ to store rulesets/traces and collect logsGVS→ device-under-test to rungvsTGEN→ to send/receive traffic
Info
These machines can also be VMs running on the same physical host. The experiments in the paper were performed where the Ansible orchestrator was running on the same machine as gvs but it could also run on the tgen or the collector machine. The collector can be the same VM/machine running gvs or tgen.
Hardware Requirements
- CPU: Intel Xeon Platinum 8358P (64 cores) @ 2.60GHz
- Memory: 512 GB RAM
- SmartNIC
- Intel XL710 (10/40G), Dual-port (for software-only Gigaflow)
- Xilinx Alveo U250 FPGA (hardware offload, support coming soon!)
Tip
The memory and CPU requirements might seem bloated because of the test setup used for experiments. You should be able to run with much fewer resources (e.g. 16 cores, 16GB RAM) as long as the Intel XL710 10/40G SmartNICs are available.
Workloads
To evaluate a virtual switch, you need some packet pipeline rulesets and matching traffic traces. We have provided a set of 5 real-world vSwitch pipelines, their corresponding rulesets and traffic traces that we used for benchmarking Gigaflow. The following are their detailed descriptions (more details in the paper).
| Pipeline | Description | Tables | Traversals |
|---|---|---|---|
| OFD | CORD’s Openflow data plane abstraction (OFDPA) for HW/SW switch integration | 10 | 5 |
| PSC | An example L2L3-ACL pipeline implemented for the Pisces paper | 7 | 2 |
| OLS | OVN Logical Switch pipeline to manage logical virtual network topologies in OVS | 30 | 23 |
| ANT | Antrea pipeline implementing networking and security for Kubernetes clusters | 22 | 20 |
| OTL | Openflow Table Type Patterns (TTP) to configure L2L3-ACL policies using OVS | 8 | 11 |
Download
Example pipelines, their rulesets, and traffic traces used for benchmarking Gigaflow are publicly available via FigShare. Download and place them on the COLLECTOR machine as following:
Step 1: create directory
mkdir ~/Gigaflow
cd ~/Gigaflow
Step 2: download the traffic traces and pipelines
# download the CAIDA traffic traces
wget --content-disposition "https://figshare.com/ndownloader/files/52608875"
# .. and vSwitch pipelines
wget --content-disposition "https://figshare.com/ndownloader/files/52608872"
Step 3: unzip the downloaded files
unzip Traffic-Locality.zip
unzip vSwitch-Pipelines.zip
Step 4: rename downloaded directories to match the vars/main.yml file
mv Traffic-Locality mini_profiles
mv vSwitch-Pipelines ovs-pipelines
Now, we are ready to setup the orchestrator and install gvs and the traffic generator (tgen).
Orchestrator Setup
You only need to setup the gigaflow-orchestrator repository that will bringup the testbed, install all dependencies (including gvs and traffic generator), and run the experiments. The orchestration is enabled via Ansible which itself is provided as a docker container.
Note
All the steps from this point onwards must be run on your orchestrator machine. For our experiments, we used the gvs machine as our orchestrator but you can choose a different machine too as long as it has docker installed.
Clone the gigaflow-orchestrator repository as following:
git clone https://github.com/gigaflow-vswitch/gigaflow-orchestrator.git
Update Local Paths
In this repository, modify the following variables in the vars/main.yml file:
| vars/main.yml | |
|---|---|
171 172 173 174 175 176 177 | |
Update only the retrieve.caida.path and retrieve.pipelines.path variables to point to a Gigaflow directory on the COLLECTOR machine.
Inventory Configurations
We use Ansible to orcherstrate all experiments using the three machines. Therefore, we require root access to each of them. To populate for each machine, update the inventory.ini file as following:
| inventory.ini | |
|---|---|
1 2 3 4 5 6 | |
To test if all machines are reachable, run the following command:
cd gigaflow-orchestrator
make ansible
This should start an Ansible docker container. Run the next commands from inside this container.
Note
Except for make ansible, all make targets must always be run from inside this Ansible docker container.
make ping
This should be successful and return something like this:
root@nga2-vm2:/workdir# make ping
ansible all -m ping
COLLECTOR | SUCCESS => {
    "ansible_facts": {
        "discovered_interpreter_python": "/usr/bin/python3"
    },
    "changed": false,
    "ping": "pong"
}
GVS | SUCCESS => {
    "ansible_facts": {
        "discovered_interpreter_python": "/usr/bin/python3"
    },
    "changed": false,
    "ping": "pong"
}
TGEN | SUCCESS => {
    "ansible_facts": {
        "discovered_interpreter_python": "/usr/bin/python3"
    },
    "changed": false,
    "ping": "pong"
}
This means all machines are reachable and you can now proceed to the next step.
GvS and TGen Installation
Now, you can install gvs and tgen along with all their dependencies as following:
make setup-gvs-experiment
You can also install them separately as following:
make install-dataset
make install-gvs
make install-tgen
At this point, you have succesfully installed gvs on the GVS machine and tgen on the TGEN machine. You have also retrieved and placed your pipelines and traffic traces on both machines and now you are ready to start running experiments!
Directory Structure
gigaflow-orchestrator/
├── roles/          # Ansible roles for all components needed to run GvS experiments
│   ├── collector/
│   ├── dpdk/
│   ├── gvs/
│   ├── logging/
│   ├── retrieve/
│   ├── rules/
│   └── tgen/
├── scripts/
├── vars/           # Experiment variables
├── inventory.ini   # Ansible inventory file
├── ansible.cfg     # Ansible configuration file
├── Makefile        # Makefile for the ansible playbook targets
├── gvs.yml         # top-level gvs ansible playbook
├── tgen.yml        # top-level tgen ansible playbook
└── ...             # other top-level ansible playbooks
Next Steps
For detailed instructions on using Gigaflow in your testbed, please refer to our usage guide.
To evaluate Gigaflow performance against Megaflow cache with real-world workloads, please refer to our benchmarking guide.